My baby cousin LOVES chocolate so I thought I would create a cupcake recipe just for her but try to make it a little bit healthier as it's not good to feed a 4 year old too much chocolate! For this recipe I tried out a couple new vegan products, the Nature's Charm chocolate syrup made by one of my absolute favourite vegan cafes in Bangkok and some new plant-based milks that were on offer at the supermarket, but if you can't find these brands don't worry you can just use any chocolate syrup and milk or instead of the syrup just use cacao powder instead for a less sweet version.
Ingredients
1 cup mashed banana
1/3 cup chocolate syrup
1/3 cup melted coconut oil
1/2 cup chocolate milk
1/4 cup coconut sugar or brown sugar (optional)
1 tsp baking powder
1 + 1/3 cup of all purpose flour
(Makes 10)
♥ Preheat and oven to 180 & line a cupcake tray with 10 cupcake cases
♥ In large bow mix together the mashed banana, chocolate syrup, chocolate milk, coconut oil and sugar, if you don't want the cupcakes to be too sweet then you can leave out the sugar.
♥ Sift in the flour and baking powder and mix it into a smooth batter.
♥ Divide the batter equally into the cupcake cases and bake in the oven for 15 - 20 minutes.
♥ Once baked removed the cupcakes from the oven and allow them to cool on a wire rack.
♥ Eat and enjoy!
Let me know if you try these out and what you think.
Good Luck
Cate
xoxo
Psssst if you like what you see and want to see more can support me by clicking the button below
One of the most commonly asked questions I get from GOT7 fans is how to get to B'Chill (BamBam's family owned restaurant, cafe & bar) so I thought I would make a little video of how you can easily visit there via Bangkok's BTS and BRT services. This location is very easy to visit via public transportation and the whole journey shouldn't cost you anymore than $3 so I totally recommend you use this method as traffic in Bangkok can get really crazy at times so this will save you so much time and money.
Step by Step Guide
♥ Take the BTS to Chong Nonsi Station (฿15 - ฿59)
♥ If you are travelling on the Sukhumvit line you will need to change to the Silom line at Siam Station (Platform 3 to Bang Wa)
♥ At Chong Nonsi Station follow the exit signs to Bangkok BRT
♥ From BRT Sathorn travel to BRT Wat Pariwat (฿15)
♥ At Wat Priwat station exit left from the station then head onwards (same direction as you were travelling via BRT) up the road for about 5 minutes
♥ You will see a sign for B'Chill at the entrance of a road, walk down that road to the end and enter through where 'Baan Itmorn' is written and B'Chil will be on your right
B'Chill is a really great place to chill, the food is amazing as always and sunset there is beautiful! It's open everyday, weeknights after 5pm and Friday, Saturday, Sunday from 11am to 2am. It's usually quieter to visit in the daytime or weekdays unless there is a special event happening such as a GOT7 birthday or anniversary celebration and on weekend nights it turns into party central for ahgase! I would also highly recommend you contact them to book at table if you intend to visit on a weekend night or during an event or concert weekend as it can fill up really fast and you may not have a place to sit!
BamBam's family visit there often in the evenings, especially on special occasions, I ran into Mama B just as I was leaving on BamBam's birthday last year and wished her a happy birthday as it was her special day to. They're always sweet and kind to the people who come visit them so don't be scared to say hello and ask for a photo if you want one, they all speak great English to so don't worry if you can't speak Thai. I hope this guide is helpful and if you have anymore questions on how to get there etc. feel free to ask and I will try my best to help, B'Chill is definitely a place you must visit if you're Ahgase coming to Thailand.
What is the place you want to visit the most in Thailand?
Love & Birbs
Cate
xoxo
UPDATE: B'CHILL WILL CLOSE AT THE END OF MARCH 2020
I will keep this guide up for the memories but if you're visiting after March 2020 it will no longer be in business, I hope one day in the future day B'Chill can return in but no matter what thank you so much to BamBam and his family for working so hard and giving GOT7 fans this wonderful safe place to meet and make new friends, I will never forget the good times I had there!
ขอบคุณทุกคนสำหรับ B'Chill ฉันจะเก็บไว้ในใจเสมอ
Psssst if you want to see more awesome cafes from around the world you can click the button below, buy me a coffee, get treats & a shoutout on my next post
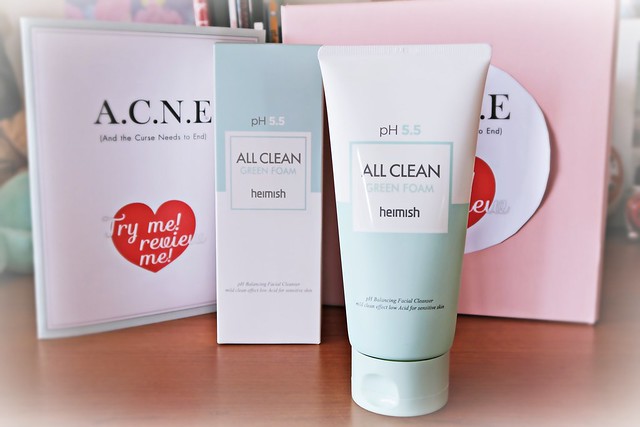
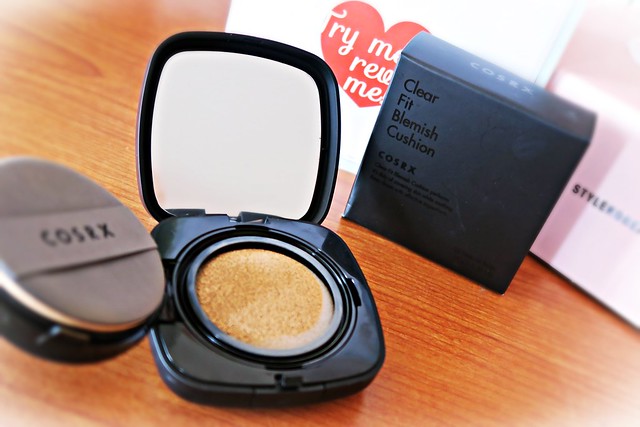
Style Korean were kind enough to send me their new A.C.N.E Try Me! Review Me! box to test out and it could not have come at a better time because after going from the harsh winter of Korea to the ridiculously hot season in Thailand my skin was freaking out! My T-zone was producing way to much sebum, I was getting breakout not just on my face but on my body, and my cheeks were super dry so I really needed something to balance my skin out and get it back to a manageable state.
Before I go more in-depth on each of the products I just want to give a special mention to their super fast shipping because this package arrived from Korea to Thailand in less than 48 hours, that's even quicker than some domestic post here so if I ever have a skincare emergency I know I can count on them to get me what I need fast! The video above shows me testing the products out for 2 weeks as I think that's the minimal amount of time you should test out any new products to see real results but as I'm the type of person who likes using products until they're finished as I'm writing this it's actually been around a month since I started using them, so here are a few of my thoughts on each.
"All ingredients rank between 1 - 2 on the EWG Cosmetic Database scale - perfect for those with sensitive skin. Provides the optimal acidity (pH 5.5) to soothe and hydrate your skin while preventing break outs and excess dryness. Contains centella asiatica and witch hazel to soothe and heal inflamed skin."
Heimish is a brand I've heard a lot of good things about so I was happy I could test out this cleaner, it comes in a really good size to so no doubt this will last me for a while. This is my first step in my skincare routine and I use it both morning and night and I've noticed quite positive results with it. My skin is super dry and this didn't dry me out at all and my skin felt super soft afterwards, it also did a really good job of removing my make-up to as sometimes I find I have to use an oil cleanser in addition to the foam cleanser to remove all my make-up but I didn't have to do that at all with this one at all. I also used it with my Clarisonic a few times a week to and it seemed to work quite well and foam up really nicely with it, I really liked the gel consistency and using just a small amount and foaming it up with water was more than enough to cleanse my whole face. I'll definitely continue to use this as I really loved how gentle and soft it was which made it perfect for sensitive skin and those days when you're suffering from a nasty breakout.
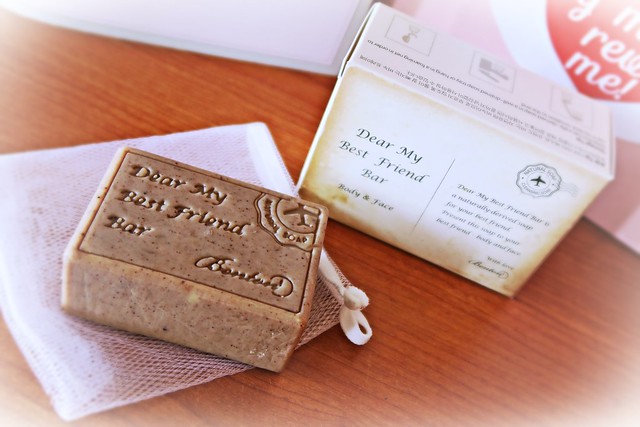
"Contains calamine, centella asiatica, tea tree and witch hazel extract to soothe and heal body acne (bacne / chestne). Cacao seed powder, papain, oatmeal and basil remove excess sebum and dead skin cells to prevent pore blockage and subsequent out-breaks."
I used this soap every morning and night to cleanse my body as I suffer from bacne which can be exacerbated by the hot sweaty weather here. It comes with a bag which you can store it in or use to cleanse your body which is what I did as the soap got smaller and harder to grip, the soap also contains small grains to give you added exfoliation but isn't to harsh or abrasive so can be used on you face to. I really loved this soap and after two weeks I had almost used it up, it didn't dry out my skin at all and I actually found I had to use less moisturiser when I was using it which was a shock as my skin is super dry! There was a couple days I switched back to my old body cleanser and I found the next day I had some acne on my shoulders so I switched back to the soap and it actually seemed to calm it down and clear it up quite quickly. I will definitely be buying this again as it worked so well for me and I love the little soap net that comes with it which makes it easy to store and also great to use as sort of sponge to prolong the life of it but most of all it really worked to heal my acne and didn't dry out my already dry skin, the only negative is that it didn't really have a scent but if you prefer unscented things it's perfect!
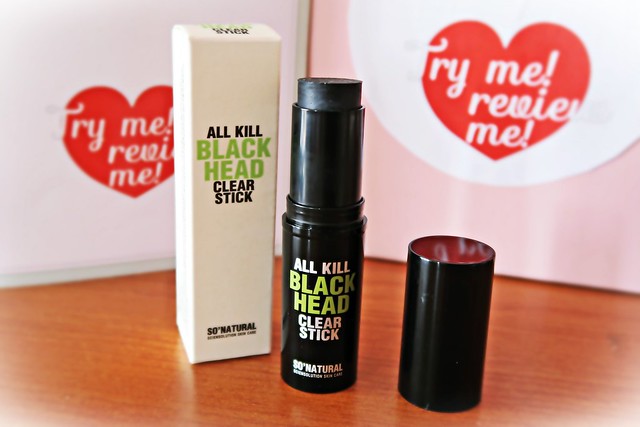
"Charcoal powder absorbs excess sebum and dead skin cells from pores to reduce blackheads and whiteheads. Contains squalane, an oil that mimics the skin's own sebum to hydrate and prevent moisture loss. Also acts as an anti-bacterial to fight against acne."
As it's bad to over exfoliate your skin I haven't used this product that often, I use it maybe once or twice a week depending on how oily my T-zone is looking. The first few times I used it I didn't notice much of a difference and wondered if I should use a nose pack to clear out my pores but I decided to just stick with it and after a few weeks I did actually notice that the pores around my nose looked much smaller and there was no need for me to reach for the nose packs at all! I use this after I've cleansed my face and it helps if you have quite moist skin and take some time to gently work the product in using your fingers to deep clean the T-zone area before washing it off. I also love the way the product is designed as it makes for easy application to the areas that need attention and it's super compact to travel with, which is always a bonus for me.
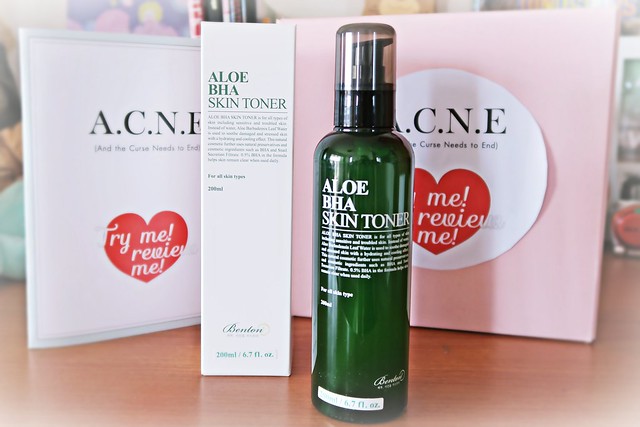
Benton Aloe BHA Skin Toner
"All componets rank between 1 - 4 on the EWG Cosmetic Database scale. Contains the key acne-care ingredients: Consists of sodium hyaluronate and glycerin to provide an intense moisturizing effect. Mildly acidic to ensure the skin's barrier is protected without stripping away any hydration."
Toners are something which I never really used to pay attention to before but over the past few years they've become essential to my routine. The key is to find one with a good slightly thick texture that doesn't dry out your skin and allow a little time before your next skincare step for it to absorb in, I really loved this one and used it night and day first wiping it on my face with a cotton pad then just patting a couple of pumps directly into my skin. My face always looked really clear and refreshed after using it and it did a great job at fading some of my hyper-pigmentation and scars as well as keeping my skin really hydrated as one of the reasons I gave up on toner many years ago was that it always dried out my skin but this one didn't have that effect at all. I did find that it was a little sticky at first but it does go away quite quickly leaving you with a nice dewy glow.
"Centella asiatica and madecassoide acts as an anti-inflammatory to soothe and heal acne prone skin. Dermatologically proven to be safe for sensitive skin. SPF 47 PA++ UV protection. Available in 3 shades (#21, #23, #27)."
This cushion has become my go to cushion and I wear it almost everyday, firstly the shade really matches me well and isn't greying or doesn't oxidise at all, secondly the coverage is really good and from one layer alone it really covered all my redness and pimples, so much so that I found I didn't really need to use as much concealer. The cushion also gives me a nice warm dewy glow, which I love as I don't like matt look foundations and feel they can be kinda ageing. The staying power is also pretty good especially with the heat here, I found that it lasted most of the day without completely melting off my skin, it's definitely better than other cushions I've used which just seem to fade after a few hours even without the heat factor but it's not the best one I've tried when it comes to staying power, however out of all the ones I have tried this is definitely my favourite and I will most definitely re-purchasing it in the future.
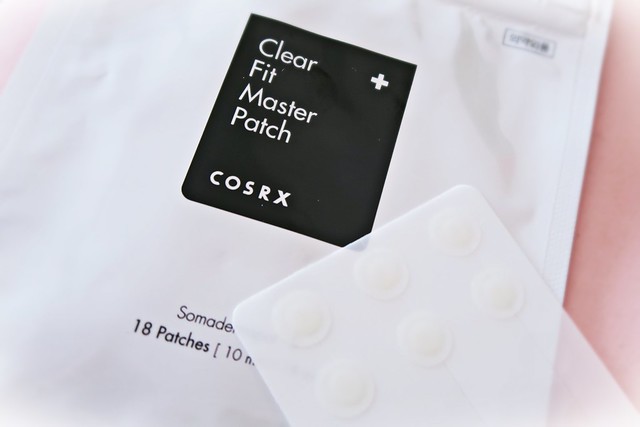
"Hydrocolloid dressing to treat acne. Absorbs impurities and protects against external factors such as bacterium to ensure faster healing."
These patches have become a staple product in my skincare routine, I love them that much! I have that bad habit of picking at pimples and aggravating them even more so these patches stop me playing around with them and allows them to heal naturally and stop me creating scars with all my popping and picking. Compared to the COSRX Acne Pimple Master Patches I used to use I like these ones a lot more, for starters they're a lot slimmer which means they adhere to the skin better and also as the sheets are cut it's easier to remove them and place them on your face, I find with the other ones when I'm trying to peel them off I often damage them which means they don't stick as well, and I also feel like the slimmer ones do a better job of sucking up all the crap that's inside your pimples. The only thing is that I wished they came in multiple sizes like the others do as sometimes they don't cover my big angry pimples but overall if I had to choose between the two it would definitely be these.
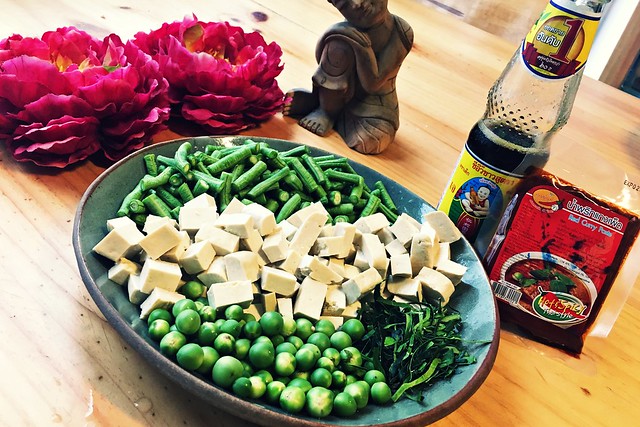
Since moving to Thailand I've hardly cooked partly because I don't have a proper kitchen in my apartment and partly because it's just so easy and cheap to eat out most of the time here, but this year I have vowed to make more of an effort to cook for myself and focus on my health. This dish is a simple yet flavourful curry stir-fry that is super simple, quick to make and a favourite amongst Thai people so I hope you enjoy it.
Ingredients
50g Thai red curry paste*
1 Tbsp soy sauce
1 Cup water
1 Tbsp finely sliced kaffir lime leaves
1 Cup chopped green beans
1 Block of diced tofu
1/4 Cup pea aubergine (optional)
*If you want to make it vegan make sure the red curry paste doesn't contain shrimp paste
♥ Add the curry paste and half the kaffir lime leaves to a wok on medium heat and cook for a few minutes until fragrant
♥ Add water, green beans and pea aubergine to the wok, you want the vegetables to be cooked but still have a slight crunch to them.
♥ Add the Tofu and soy sauce to the wok and cook until most of the moisture has been cooked off, if you find it's too spicy then add more soy sauce.
♥ Remove the dish from the wok and sprinkle the rest of the kaffir lime leaves on top as garnish.
Being a "Fannibal" antlers are something I have tried to make multiple times but I was never happy with the end results, this time however I was so pleased with how freakin' simple they ended up being and how awesome they looked that I thought I would post a tutorial so you all can make them to.
YOU WILL NEED:
Let's begin...
STEP 1: Wire Frame
First I wrapped some wire around the headband to give me and anchor then I basically freehanded the design until I got a shape I was happy with, using the pilers to help flatten and twist the wire, so go crazy with one you can make them as long or as short as you want .
STEP 2: Masking Tape
To create a basic shape and form the antlers I used masking tape because it's lightweight, sticky and easy to mould. I basically wrapped tape around the wire frame to create the defined points of the antler and add mass to it so I'd have a base to work with.
STEP 3: Papier Mâché
To give the antlers strength I decided to go down the papier mache route as this would be lightweight but durable and I decided to use glue instead of flour and water to prevent mould and create a stronger base. I used small strips of newspaper and did about 3 - 4 layers letting it dry for a few hours between each layer, if you want yours thicker then add as many extra layers as you want until you're happy with the result just make sure to let it dry completely before starting on the next layer.
STEP 4: Prime
Once I had allowed my Papier mache base to dry overnight I decided to prime the base to cover up the newspaper print so I would have a nice clear and easy base to work with. Also at this point you can also sand down any lumps and bumps you don't want, I chose to keep mine a bit rustic and gnarled for a more natural effect.
STEP 5: Paint
I used acrylic to paint my antlers black and painted about 3 - 4 coats until they were opaque. As with the primer be sure to let your paint dry completely for a few hours between coats to prevent any streaking and unevenness then once you're done allow them to dry overnight to make sure the paint is completely dry before you wear them.
STEP 6: Gloss & Decorate (optional)
If you want a shiny finish to your antlers you can paint on a coat of modge podge gloss and if you wanted to add a few flowers like the antlers above just simply glue them on with a glue gun.
If you decide to make your own antlers be sure to let me know in the comments, I want pics!
Winter is a great time to get crafting, as the days get darker and colder you find yourself spending more time indoors and the best way to get rid of that boredom or just get that butt off the sofa and doing something useful is to give yourself a project. I always use the Christmas holidays as a time to work on some personal crafts (#cosplaychristmas) so here are a few awesome tutorials I've found which would be fun to do over the holidays.
Summer is here and I absolutely love it, I'm at my happiest and most inspired in the summer which makes it the perfect time to get fun and get creative, so here are just a few awesome tutorials I found which would be perfect to try out for the summer.
I'm probably at my most happiest when I'm creating something but lately I've been lacking in inspiration so off to YouTube I went to seek out some simple but fun D.I.Y. projects to try out. I thought the mugs and brush holder would be a fun project to do with kids and the other two would give me a chance to work on developing my crochet and clothes making skills so check them out below, I'm sure they would be great for a fun weekend project.
My make-up travel bag was starting to get a bit too heavy and as I only use a few shades out of each palette I thought it was about time I made my own. As much as I love my Liberty Hello Kitty palette it's not very durable, it's cardboard and the mirror is plastic so I thought I would re-pot a couple of my favourite shades into my favourite MAC palette which is more portable, durable and has a great mirror, and here's how I did it....
Make sure the eyeshadow is completely dry before you use it, I left it overnight and packed it down using the back of the spoon (and a clean finger) to check all the moisture had gone, it's as easy as that!
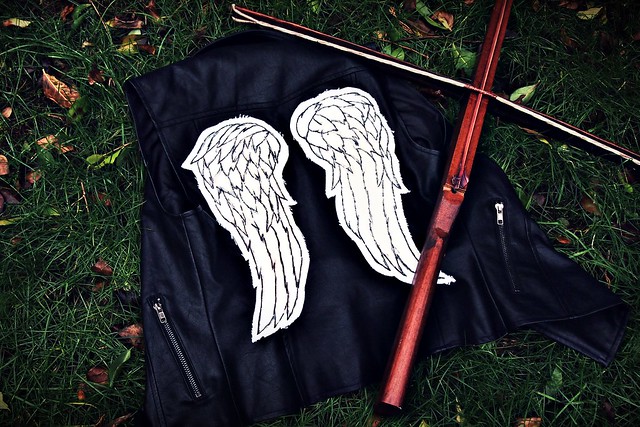
Daryl Dixon is one of my fave characters from The Walking Dead and ever since saw his angel winged vest back in season 2 I have wanted to make my own. It took me a long time to get round to making this vest because of my seemingly endless search for the perfect vest but I finally found one (from Forever 21) and now "Project Dixon Wings" is complete I'm going to show you how I made mine and how you can make one to.
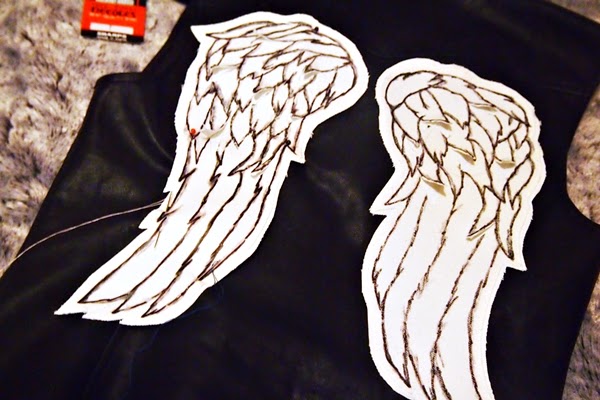
Once I was happy with the design I did a few test prints to make sure I got the sizing right for my vest then you can either use the stencil method to paint on your wings which I used to make my Direwolf Jacket or you can draw them on or use transfer paper to iron the template onto the fabric which is my preferred method as I found it much easier and quicker. Pro tip if you use transfer paper remember to mirror your design otherwise your wings will be the opposite way round and remember to read the instructions as different paper brands can give different results.
I then went over the print with a fabric pen to make the outline stand out more and add detail then once I was happy with the results. I cut out the wings leaving a 1cm border (just to prevent any fraying) and ironed them to seal in the ink. I prefer using fabric pens as they're easy to use and give a great results but there are lots of other options you can use, personally I would've loved to embroider the outline of my wings but my sewing skills aren't that good yet...
At this point your wings are pretty much done but to give my wings a fun "realistic" effect I decided to cut a few of the feathers out, to do this I just used a smaller pair scissors, made a small incision and cut carefully around the outline. There areother fun thingsyou can do to make your wings look more worn and Daryl-esque but I decided to keep my wings clean and wear them in naturally.
Another thing I did to give the wings more strength and keep them rigid was to give them an extra layer of fabric by just using fabric glue to stick them back onto the fabric. I also made sure any feathers I cut out didn't stick back onto the fabric and applied some glue around the edges of them to prevent fraying and make them extra rigid. I then allowed the glue to dry overnight and cut the wings out again leaving a small border around them just to prevent fraying.
There are a few options you can use to attach your wings onto your vest, you can use fabric glue or iron them on or sew them on. I decided to sew mine on as I thought it would be more longer lasting and durable than gluing. To begin I first pinned the wings into place, tried on the vest and checked in the mirror to see if my placement was correct, then went through this process a few more times until I was happy I had them in the right position.
I used the outline as a guide to sew on the wings, pro tip make sure you use a strong needle to go through all those layers of fabric as I managed to break mine the first time! Before I started on the second wing I checked the placement first to make sure it was still symmetrical as the fabric can move quite a bit whilst sewing then re-pinned and tried it on to make sure everything was looking good before sewing that one on to.
And it's done!
Who is your fave character from The Walking Dead be sure to let me know in the comments
One of the best things about staying in during these colder months is that you have lots of time to craft. I'm going through one of those rare times when I have nothing to craft, or should I say no personal craft projects going on as my Etsy & Storenvy keep me pretty busy, but I love trying out new things so I found these cute, simple crafting tutorials on YouTube and thought I would share.
The best way to start 2013 is with a project to get those creative juices flowing. You guys know I love crafting so much I've made itmy job and when I'm not busy making stuff for you guys I'm making something for myself, but even if you don't think of yourself as a very "crafty" person these simple tutorials are super easy to follow and fun to do so be sure to check them out.
♥D.I.Y Baroque Tights Tutorial - I love the Baroque trend and these tights are really classy and make a great addition to a simple outfit.
♥How To Sew A Heart Tote - This is so cute and with Valentine's Day next month would make a great gift for one of your loved ones
♥Afraid of Halloween Nails - Ok so maybe Halloween has long since past and we have to wait and even longer time for it to come back but these awesome nail designs can be worn all year round!
♥His + Her Sharpie Mug - This is a really simple way to jazz up some plain mugs and again would make a really great Valentine's Day gift.
If you liked the scarf I posted in my last outfit post well here's a little tutorial on how to make your own as it's super easy to do, also be sure to check out this post I did a while back for extra information on how to make poms poms.


