21 December 2022

Vegan & Gluten-free Soda Bread 🍞


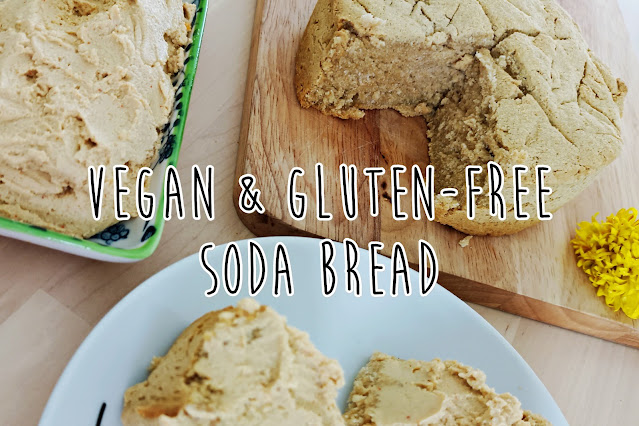
The perfect compliment to my vegan cream cheese recipe is this vegan and gluten-free soda bread. During lockdown when I was unable to go to a bakery I used to make soda bread all the time as the ingredients are so simple, easily available and it's really quick to make unlike regular bread which requires yeast and a lot of kneading and time proving, this bread however can be done in less than 30 minutes!

-----

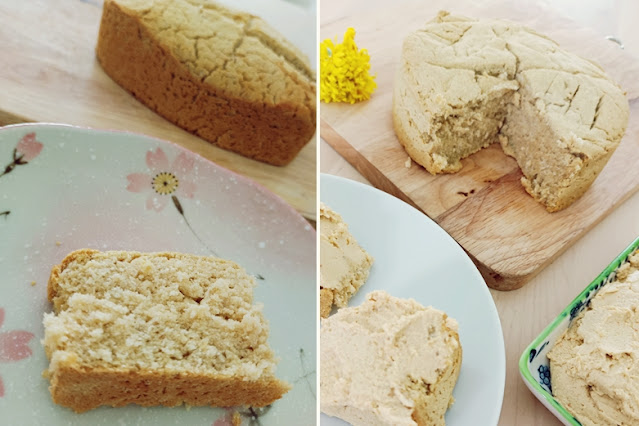
Soda bread has a much denser texture compared to regular bread and making a gluten-free version I expected to be challenging but whilst still being being dense compared to regular yeasted bread I found this version to be softer and lighter than my regular soda bread and I actually prefer it much more so this is the recipe I decided to share.


Most of the bread widely available in Thailand contains milk and has a sweet taste which I'm not a fan of so this is a nice easy, quick alternative for me to make at home and to level it up you can also add in some herbs and spices, I often chop up some rosemary from my garden and throw it into the mix which gives it a great fragrance and taste.

Ingredients
  • 3/4 cup Rice flour
  • 1/4 cup Coconut flour
  • 1/2 tsp Baking powder
  • 1/2 tsp Baking soda
  • 1 cup Oat milk
  • 1 tbsp Apple cider vinegar
  • 1 tbsp Ground flax seed
  • 3 tbsp Water

Step 1 - Preheat an oven to 220°C
Prepare a small baking tin by greasing it with a little oil and line the bottom with some baking paper.

Step 2 - Make the buttermilk
Mix together the oat milk and apple cider vinegar in measuring jug and leave to curdle for 5 - 10 minutes.

Step 3 - Make a flax egg
To make a flax egg mix together the ground flax seeds and water in a small dish or glass and leave to stand for a few minutes so the mixture gets thicker and more gel like in consistency.

Step 4 - Mix together the dry ingredients 
In a mixing bowl mix together the rice flour, coconut flour, baking soda and baking powder.

Step 5 - Add in the wet ingredients
To the flour add in the flax egg and buttermilk mixtures and mix until well combined, the mixture should come together and look like a wet dough.

Step 6 - Shape the Loaf
Shape the dough into a round ball which is about 1" - 1.5" thick and place into a baking tin and score the top with a cross about half and inch deep.

Step 7 - Bake in a oven
Place the bread into the center of a pre-heated oven and bake for 15 - 20 minutes until the top has a golden brown crust.

Step 8 - Let it cool
Once cooked take the soda bread out of the oven and let it cool for 10 - 20 minutes then remove it from the tin and let it cool for a little while longer before slicing and serving. Leaving it to cool will help the structure so when you cut into it it won't be too crumbly.

Step 9 - Serve and store
You can serve the soda bread sliced or toasted in the oven for a few minutes with some cream cheese, it also goes great with soups and stews. The bread will last around 3 - 5 days in an airtight box which you can leave on the counter or if you live in a warmer climate like me then you can keep it the fridge.


Happy Holidays and be sure to tag me on Instagram if you make it
Love & Hugs
Cate
xoxo


If you like what you see and want to see more can support me by clicking the button below


08 December 2022

Super Easy Vegan Cream Cheese 🧀


Christmas is coming and there's nothing like a cheese board to get you in the mood for the season however if like me your stomach suffers when overloaded with dairy and you don't want to spend all day running to the toilet this dairy-free vegan cream cheese alternative is quick and easy to make and tastes just as good, if not better than the real thing.


Consider this recipe is a base with which you can add all sorts of flavours to. I love adding some smoked paprika into the mix and have also tried it with roasted garlic and rosemary. So feel free to add in some of your own herbs and spices and even some dried cranberries, a dash of brandy and some orange zest for a more festive flavour. 


The best thing about this is that it's super simple and really quick to make you just need a blender and that's it! I always thought vegan cheeses were difficult to make but this is a really easy substitute for when you have those cheese cravings and the ingredients are really simple and easily available. I honestly prefer this over a lot of the cream cheeses I used to eat and as a bonus it's much healthier for your than the regular dairy cream cheese.

Ingredients
  • 170g Firm tofu
  • 4 Tbsp Nutritional yeast
  • 1 Tbsp Olive oil
  • 2 Tbsp Apple Cider Vinegar
  • 1 Tsp Miso paste
  • 2 Tbsp unsweetened soy milk (if you want a thicker cheese you can omit this)
  • Salt & Pepper to your taste

Step 1 - Blend
In a blender add all of the ingredients and blend until smooth. I recommend that you also give it a taste at this point and if you need to you can adjust the taste to your liking.

Step 2 - Chill
Scrape the mixture out of the blender and put it in a airtight box to chill for a couple hours in the fridge. You can serve straight from the blender but I think the texture and taste is much better after it's chilled for a little while.

Step 3 - Serve
Once the cream cheese has chilled it's ready to eat so just spread it on some toast and enjoy and it should last 3 - 5 days in an airtight box in the fridge depending on how fresh your tofu is.

Happy Holidays and be sure to tag me on Instagram if you make it
Love & Hugs
Cate
xoxo


If you like what you see and want to see more can support me by clicking the button below


03 December 2022

Vegan & Gluten-free Welsh Bara Brith 🎄


Bara Brith always reminds me of Christmas. It was one of the first things I learned how to bake and every Christmas my auntie would gift us a loaf along with her homegrown, homemade apple chutney. This year I wanted to bring a little bit of that Welsh Christmas spirit into my new house in Chiang Mai and create a version that was both vegan and gluten-free so everyone could enjoy it.


If you've never had Bara Brith before it's similar to a fruit loaf but what makes it special is that the fruit is soaked in tea giving the loaf a nice tea flavour. It's the perfect Christmas cake alternative if you don't like a heavy dense fruit cake or strong spices and it goes nicely with a warm cider or hot eggnog.


As the main ingredients of Bara Brith are eggs and flour it was a bit of a challenge to make this both vegan and gluten-free and get the texture right but after a few failed attempts I'm finally happy enough with the results to share my recipe in time for Christmas.


Ingredients
  • 100g Dried mixed fruit
  • 70g Brown sugar
  • 100ml Hot water
  • 1 Tea bag (Yorkshire Tea is my favourite but any breakfast or black tea will work)
  • 100g Gluten-free flour mix
  • 30g Riceberry flour 
  • 70g Unsweetened applesauce
  • 1/2 tbsp Ground flax seeds
  • 1 tsp Baking Powder
  • 1/4 tsp Cinnamon powder

Step 1 - Soak the fruit
The first thing to do is make a very strong tea brew, I usually let the tea bag soak in boiling water for about 5 minutes and then give the tea bag a good squeeze to get all the flavour out. After the tea is brewed add 100ml of the hot tea into the dried mixed fruit and brown sugar, give it a stir to help the sugar dissolve, and leave it to soak overnight. 

Step 2 - Preheat an oven to 180°C
Prepare a 6" loaf tin by greasing it with a little oil and line the bottom with some baking paper.

Step 3 - Mix the dry ingredients
In a mixing bowl mix together the flours, ground flax seed, baking powder and cinnamon

Step 4 - Add the wet ingredients
To the dry ingredients add in the tea soaked fruit and mixed until combined. There's no need to drain the fruit just add in the whole tea, fruit, sugar mix.

Step 5 - Mix in the applesauce
Lastly fold the applesauce into the mixture until well combined.

Step 6 - Pour batter into a loaf tin
Evenly distribute the batter in the tin and then drop the tin on the kitchen counter a couple of times to make any air bubbles rise to the surface and ensure you don't get any holes in your loaf.

Step 7 - Bake in a oven
Place the loaf tin into the center of a pre-heated oven and bake for 20 - 30 minutes or until a toothpick comes out clean. If the top of the loaf is starting to look like it's burning but the loaf isn't completely cooked through yet you can cover it with tin foil on top to prevent the top from burning.

Step 8 - Let it cool
Once cooked take the Bara Brith out of the oven and let it cool for 10 - 20 minutes then remove it from the tin and let it cool for a little while longer before slicing and serving. Leaving it to cool will help the structure so when you cut into it it won't be too crumbly.

Step 9 - Serve and store
You can serve the Bara Brith sliced plain or with a bit of butter or honey and if you need to store it, it will last around 7 days in an airtight box which you can leave on the counter or if you live in a warmer climate like me then it's better to keep it the fridge.


Happy Holidays and be sure to tag me on Instagram if you make it
Love & Hugs
Cate
xoxo


If you like what you see and want to see more can support me by clicking the button below